With the rise of eCommerce and the growing demand for high-quality visuals, there’s never been a better time to start monetizing your photography skills. Turning your passion into profit is more achievable than ever when you learn how to sell photography online.
As a member of the Imagely team, I’ve spent the past few years diving deep into the world of photography eCommerce—learning what works, what doesn’t, and how photographers can build successful businesses online. I’ve had the opportunity to study real user success stories and experiment with the tools photographers use every day to grow their stores.
Through testing countless strategies, analyzing conversion data, and working alongside developers and creatives, I’ve built a solid understanding of what it takes to sell photography online. The best part? You don’t need technical skills or a huge budget to get started.
In this guide, I’ll walk you step-by-step through how to sell photos on WordPress—one of the easiest and most cost-effective methods available. Whether you’re just getting started or looking to scale your existing website, you’ll learn exactly how to turn your photography into a thriving online business—no guesswork required.
Why Sell Your Photography Online?
Selling your photos online offers numerous benefits for photographers:
- Reach a global audience and expand your customer base
- Create a passive income stream from your existing photo library
- Set your own prices and keep 100% of the profits
- Establish your brand and showcase your unique style
- Gain exposure and attract potential clients for your photography services
Which platform should I use to sell my photos?
There are various platforms available for selling photos online, including stock photo sites like Shutterstock and Adobe Stock and and online marketplaces like Etsy. However, the best option is to create your own site using WordPress. By having full control over your photography website and online store, you can:
- Set your own prices and avoid commissions. That way, you keep 100% of the profits instead of settling for the measly payouts that most stock image sites and stock agencies offer.
- Customize your site to reflect your brand and style.
- Offer a seamless and professional user experience.
- Implement advanced eCommerce features tailored for selling photos.
- Build a strong online presence and improve your search engine visibility.
Curious about other website platforms like Shopify and Squarespace? Check out our article on Squarespace vs. WordPress.
WordPress Tutorial: How to Sell Photography Online
Before you can learn how to sell photos on WordPress, you’ll need to set up a WordPress photography website if you don’t already have one. This involves:
- Choosing a domain name and web hosting provider
- Installing WordPress on your hosting account
- Selecting a photography-focused WordPress theme, such as the Imagely theme
For a full walk through, check out How to Create a Photography Website.
Step 1: Install Imagely
With over 32 million downloads, Imagely is the most powerful and comprehensive WordPress plugin for photographers looking to sell their work and make money online.
The plugin is packed with powerful features for professional photographers and visual artists such as it’s own built-in eCommerce platform, print-on-demand services with automatic fulfillment, client proofing, image protection, Adobe Lightroom integration, social media sharing, SEO optimization, and more.
Plus, it’s easy to use for beginners and comes with tons of customizable gallery layouts like mosaic, masonry, tiled, and more. Even if you’re just starting a side hustle with photos taken on your iPhone, Imagely can help!
Imagely’s gallery and eCommerce features let you:
- Create beautiful, responsive galleries to showcase your photos.
- Sell your photos as digital images or photo prints and set up unlimited pricelists.
- Accept payments through popular gateways like PayPal and Stripe.
- Automate print fulfillment through Imagely’s integration with professional print labs.
- Implement image protection and watermarking to safeguard your work.
- Offer coupons and promotions to incentivize sales.
- And more!
To get started, head to the Imagely pricing page and grab the license level that works best for you. You’ll need a Pro license or above to access eCommerce and proofing functionality. After your purchase, download the plugin from your My Account area.
Install NextGEN Gallery
NextGEN Pro works on top of the free version of the plugin. So, we’ll need to install that first.
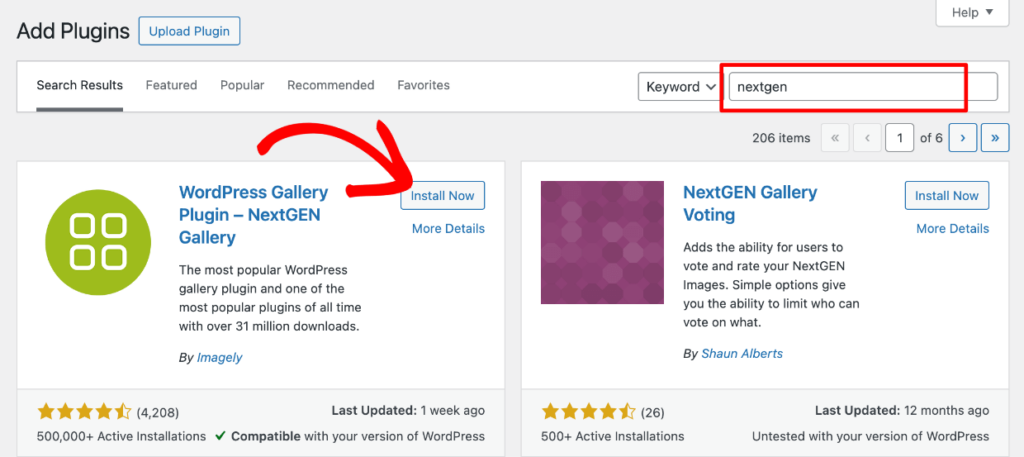
Head to your WordPress site and click Plugins » Add New Plugin. Use the search bar to find and install NextGEN Gallery. When the button changes to save Activate, click it.
Activate NextGEN Gallery Pro
After the free plugin is installed and activated, click Upload Plugin at the top.
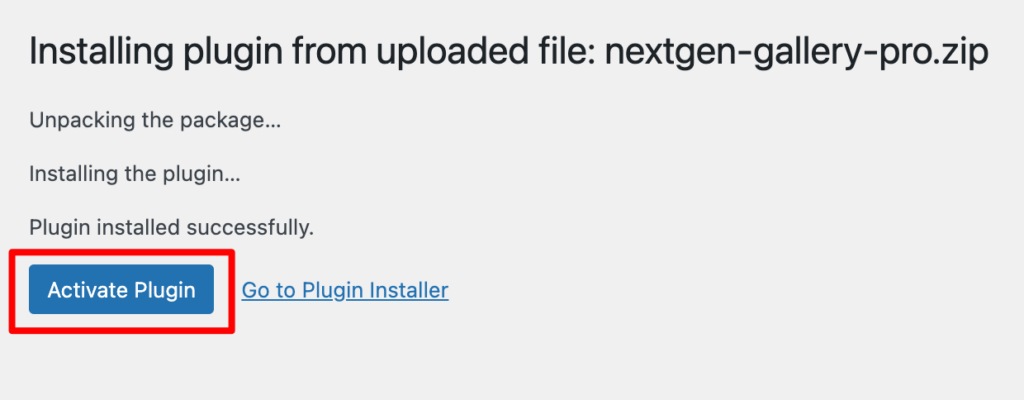
Then, go ahead and upload the NextGEN Gallery Pro zip file that you downloaded after purchasing a license. Press Install Now, and make sure to click Activate after it finishes installing.
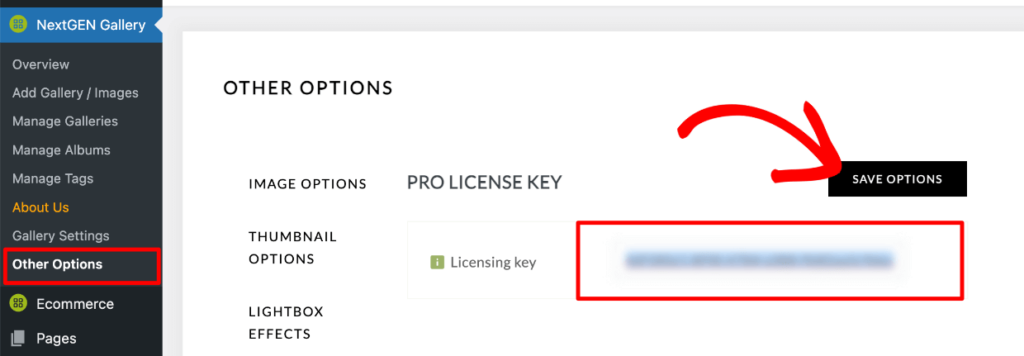
Now that the Pro plugin is activated, the last thing is adding your license key. Go to NextGEN Gallery » Other Options from your WordPress menu and click Pro License Key from the menu on the left. Then, paste your license key (you can find it in your account area or your confirmation email after purchase) into the box and press Save Options.
After that, you’re ready to set up eCommerce and starting selling your pictures!
Step 2: Configure Your eCommerce Settings
Pro Tip: Imagely includes a handy eCommerce checklist that you can refer to when setting up eCommerce. To find it, just click Ecommerce » Ecommerce Set Up from your WordPress menu.
To start, go to Ecommerce » Ecommerce Options. Go ahead an fill out the information under General Settings. For example, you’ll need to select your currency, checkout page, and add-to-cart icon. You’ll also need to add required information like the name of your photography business, the address, and your email.
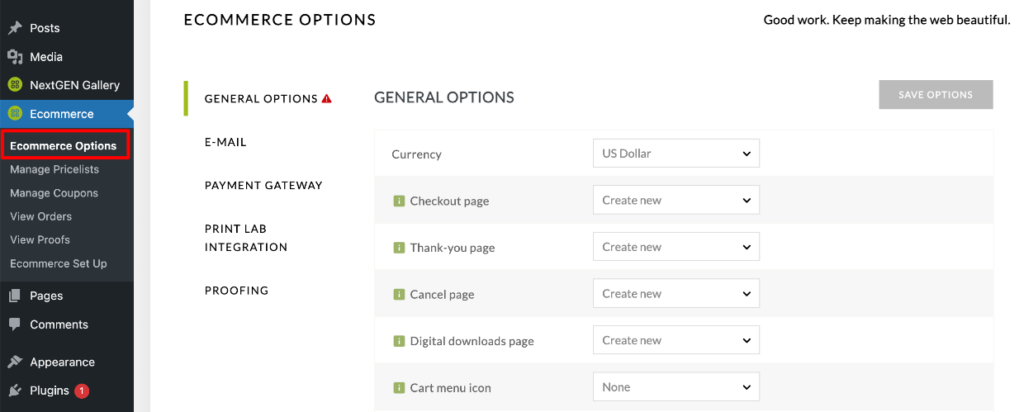
After that, use the tabs on the left to configure your E-Mail templates and Payment Gateway settings. If you plan to sell photography prints and/or use client proofing features, you should also go through the settings under Print Lab Integration and Proofing.
When you’re finished filling out all the options under each section, press Save Options in the top right.
For more information about all of the choices and configurations under Ecommerce options, see our documentation.
Step 3: Create a Pricelist
With NextGEN Pro, you can create unlimited custom pricelists with an unlimited amount of options that include both digital downloads and print/product options.
To add a pricelist, go to Ecommerce » Manage Pricelists and click the Add New Pricelist button.
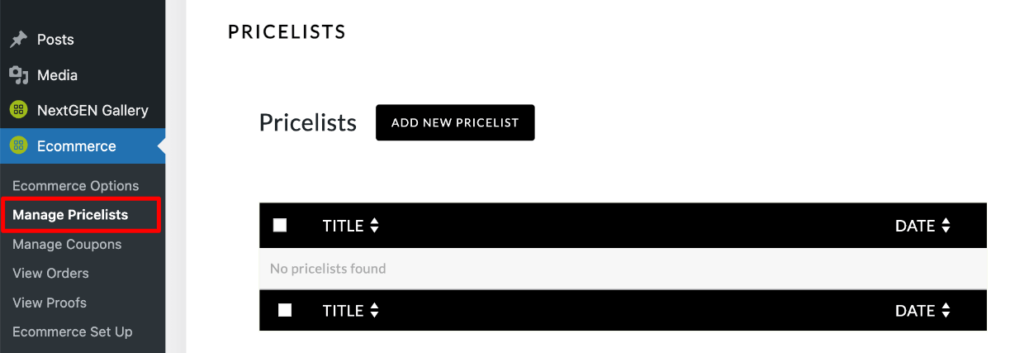
Give your pricelist a name and click Add Product.

After that, you’ll see a popup where you can select what type of product to add. You can add WHCC Prints (automatic fulfillment), Manual Fulfillment products, or Digital Downloads. For this tutorial, we’ll add Digital Downloads.
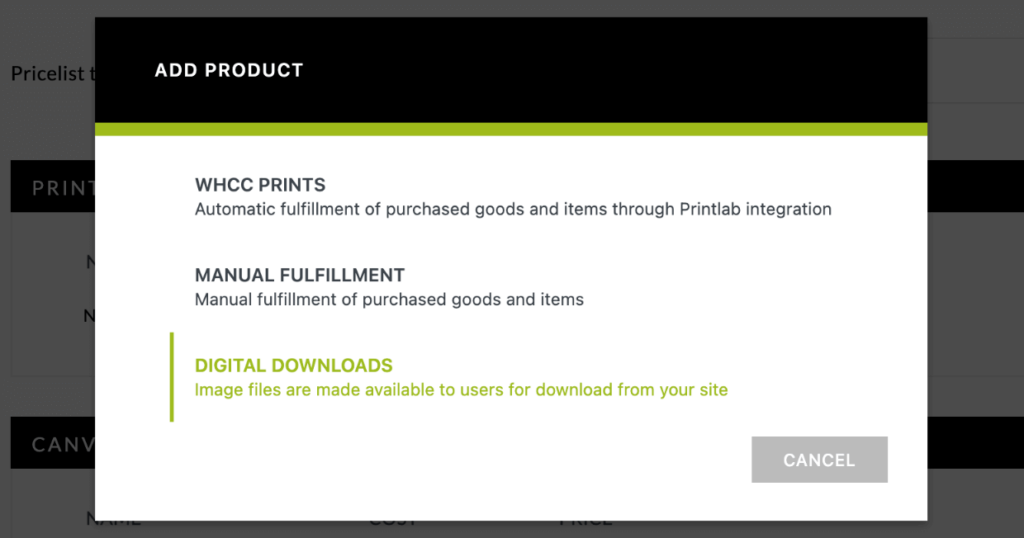
After selecting Digital Downloads, you’ll enter a name (low resolution, high resolution, etc.), price, and the longest image dimension (type 0 to set it as the maximum and deliver high-quality images in full resolution).
If you want to offer a product for free or a free option, all you need to do is set the price to 0.00.
Click Add Product after you’ve entered the details.
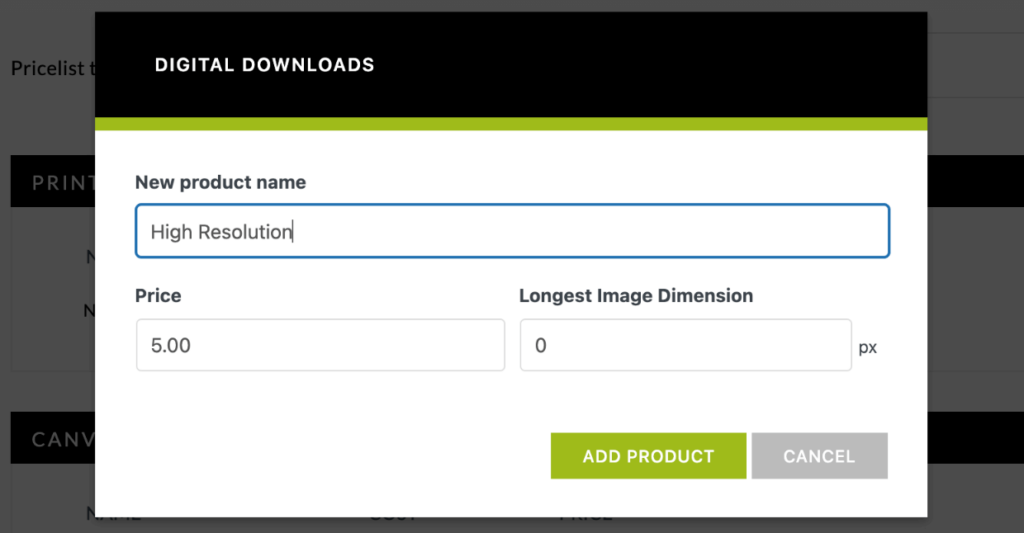
Now, you can scroll down in your pricelist to the Digital Downloads section and see the new product you just added. Click Save at the bottom.
Pro Tip: You’ll definitely want to check the box to Display link to license terms and set up a page with usage terms for your photo-selling business. For example, you’ll want to establish exclusive images (or non-exclusive rights) and decide if purchased images are provided royalty-free, etc. Check out this website to see model releases and other legal resources for photographers.

Go ahead and repeat the process for any more products or variations that you want to add to the pricelist. Note that you’ll need to click Save on the pricelist after every product that you add. If you’re adding physical products and prints, you can use the Bulk Markup button to automatically apply a percentage or flat markup to all your items.
Step 4: Assign Your Pricelist to a Gallery
Next, let’s assign the pricelist you made to the photos you want to sell online. Navigate to NextGEN Gallery » Manage Galleries and select the gallery you want. If you haven’t created any galleries, learn how to upload photos and get started in How to Create a WordPress Image Gallery.
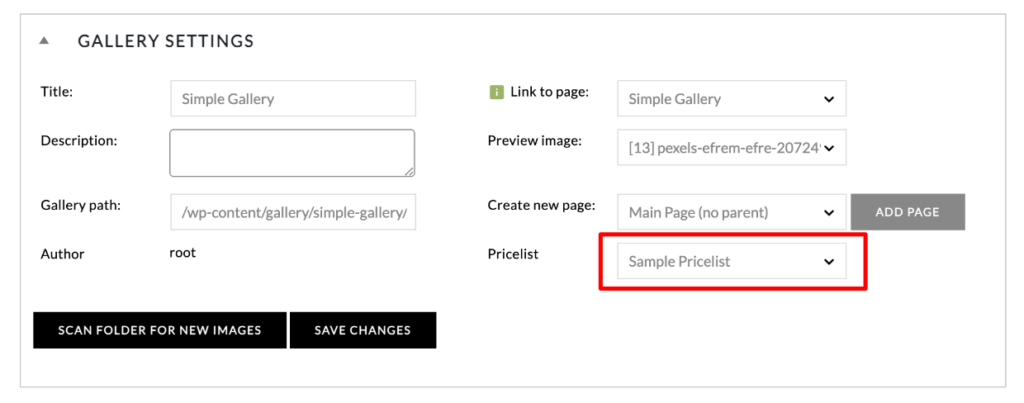
After selecting the gallery you want, click the Gallery Settings tab at the top of the list of images. Use the dropdown menu to choose the Pricelist you want to assign. Then, click Save Changes at the bottom.
In the list of gallery images, you’ll see an Ecommerce dropdown menu next to each photo. You can use this to assign individual photos to different pricelists or mark them as not for sale.
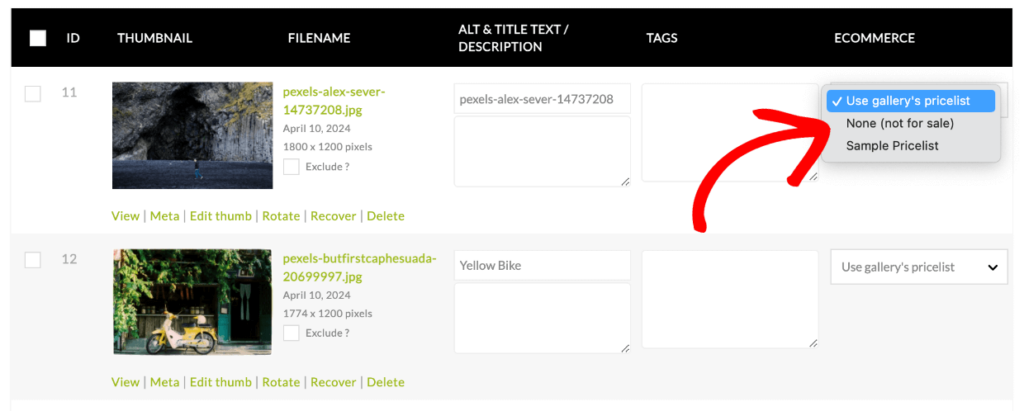
Be sure to click Save Changes if you make and adjustments.
Step 5: Add the eCommerce Gallery to Your Site
You’re almost done, but before we can place the gallery on a page or post, you need to make sure that your galleries are set to use the Pro Lightbox design. This has to be enabled for the eCommerce features to work properly.
Go to NextGEN Gallery » Other Options and click Lightbox Effects from the left menu. Use the dropdown menu to select NextGEN Pro Lightbox and click Save Options.
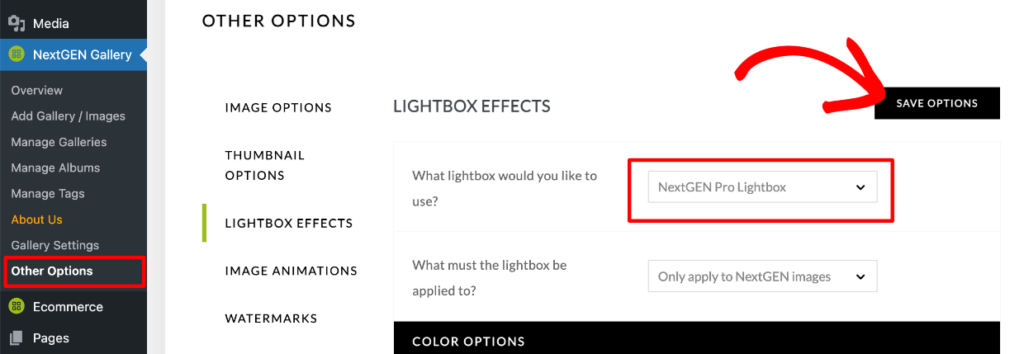
Pro Tip: You can use the other tabs in this area to customize effects, add watermarks, enable image protection, and more.
Now, let’s add your gallery to a page or post, so you can sell your photography online!
Head to the page or post where you want to insert your gallery. Click the + sign to add a new block and search for/select NextGEN Gallery.
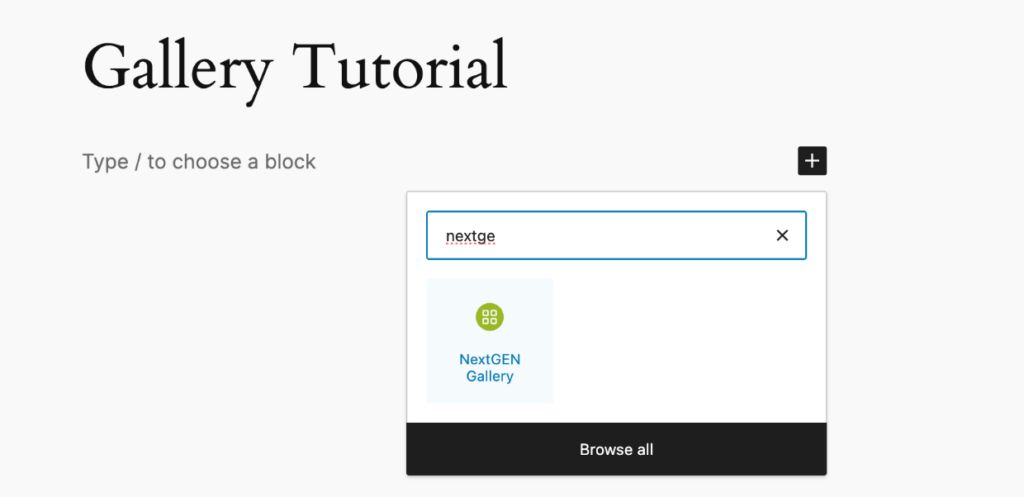
Now you’ll see the NextGEN Gallery block on your page or post. Click the button to Add NextGEN Gallery.

In the popup, use the dropdown menu to select the gallery you want to embed (the one you assigned a pricelist to) and choose the layout you want.
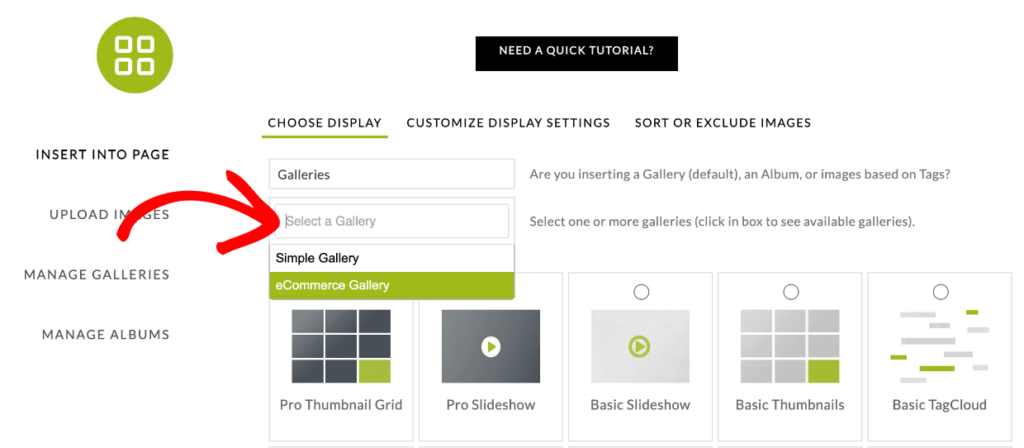
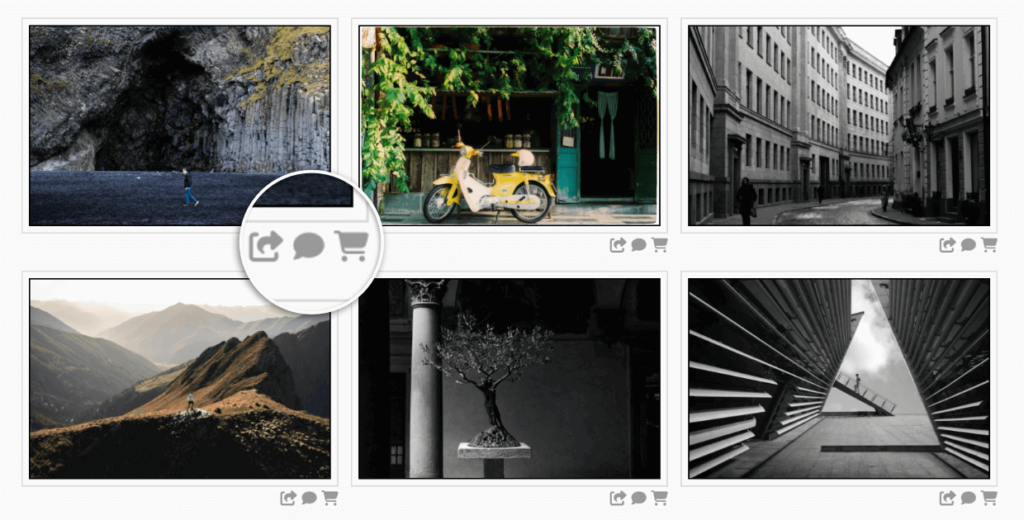
Next, click Customize Display Settings at the top. If you want to show a cart icon under each photo in the gallery view, scroll to the bottom and enable Display Triggers.
Then, ensure that Yes is checked next to Enable eCommerce.
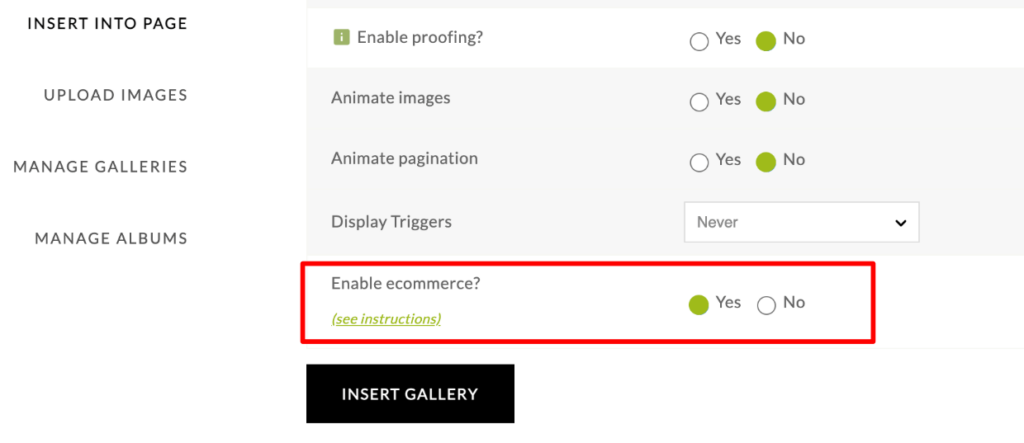
You can now go ahead and press the Insert Gallery button.
Step 6: Start Selling Your Photos Online
After you’ve added your gallery with the photos you want to sell, be sure to click Publish or Update to save your changes.
Now head to your website to see how customers can buy your photos! If you enabled Display Triggers, the first thing you’ll notice is cart icon below each photo.
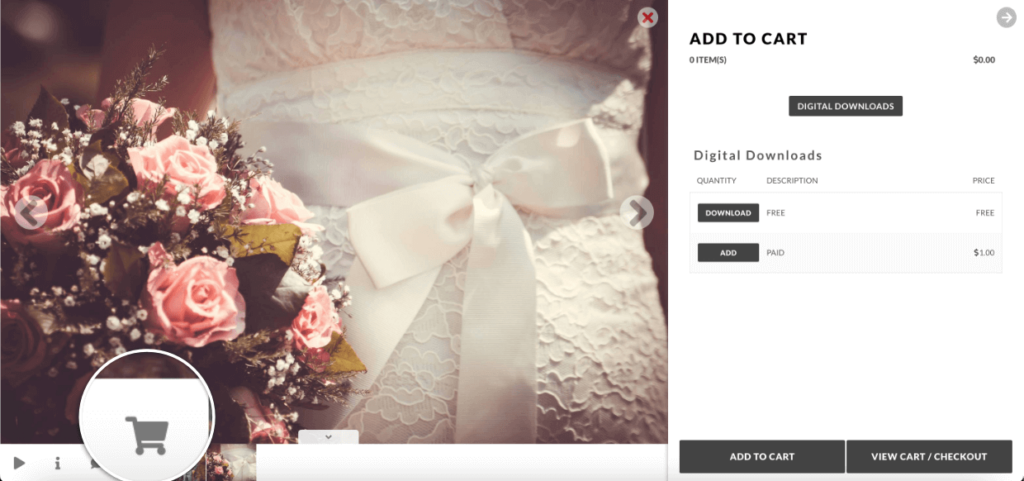
In the lightbox view, potential buyers will also see a cart icon. When clicked, it will open a sidebar with the available purchase options. They can easily add photos to their cart, view items they’ve already added, and go to the checkout page.
On the checkout page, customers will see a list of the items in their cart. They’ll be asked to provide their name and email as well as their shipping address if the cart contains prints or other physical products. From there, they’ll choose a payment method and complete their purchase.
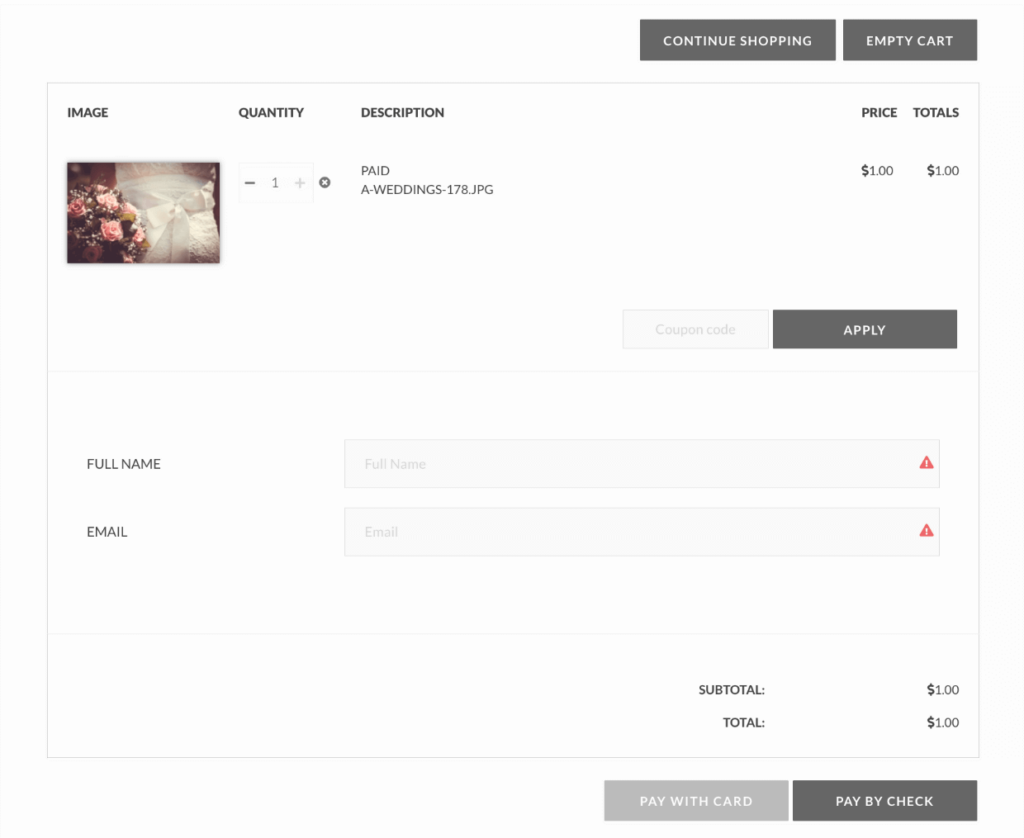
Easy peasy, right? You learned how to sell photography online!
By creating a WordPress website and leveraging the power of NextGEN Pro, you can showcase your work, offer a variety of physical prints and digital photos, and streamline the sales process for your online business.
Frequently Asked Questions
1. Can I sell photos on WordPress without using WooCommerce?
Yes! With Imagely’s built-in eCommerce features, you can sell digital downloads and prints directly from your WordPress site—no need for WooCommerce or third-party platforms.
2. How do I price my photos for online sales?
Pricing your photos depends on various factors, such as your target market, the uniqueness of your work, and production costs. Research your competition or other stock photography sites, and consider your time, effort, and expenses when setting your prices. Low-res downloads are often offered for $10–$30, while high-res or print-ready images may go for $50–$250+. Imagely allows you to create flexible pricelists to accommodate different products, price points, or even individual clients.
3. Can I offer both print products and digital downloads?
Yes, Imagely enables you to offer a wide range of print products and digital downloads. You can create separate pricelists for each type of product or combine them within the same pricelist, giving your customers the option to choose their preferred format.
4. What payment gateways can I use with Imagely?
Imagely supports popular payment gateways, including PayPal and Stripe. This allows you to accept various payment methods, such as credit cards and PayPal transactions, providing a seamless and secure checkout experience for your customers. You can even accept checks, which is ideal for customers who want to avoid transaction fees and pick up physical prints or products in person.
5. Can I sell photos online without a website?
While it’s possible to sell photos through stock photography websites like Getty Images (iStock Photo), Alamy, Dreamstime, and Smugmug, having your own website gives you more control, flexibility, and earning potential. With NextGEN Pro and WordPress, you can create a professional photography website or even you’re own stock photo website that’s optimized for sales without needing any coding skills.
Selling your photography online is a fantastic way to monetize your skills, reach a wider audience, and build a thriving business around your passion. Remember to continually refine your website, product offerings, and marketing strategies to adapt to your audience’s needs and preferences.
Don’t have NextGEN Pro yet? Get started today!
We hope you enjoyed learning how to sell your photography online! With dedication, creativity, and the right tools, you can successfully sell your photos online and turn your photography into a profitable venture.
If you liked this article, be sure to check out our Photoshop and Lightroom Tips on How To Manage Post-Processing Efficiently.
For more photography tips and WordPress tutorials, check out our blog.



Kasia's fotogalerie
8 Dec 2022Very nice blog, we purchases the theme and we absolute love it! Keep the blogs coming, really helpful and entertaining!