Building a professional photography website is one of the most important steps you can take as a photographer to showcase your work and grow your brand. While social media is great for sharing snapshots, it doesn’t offer the same level of control, visibility, and flexibility as having your own website.
Creating a photography website gives you a dedicated space to display your portfolio, attract potential clients, and even proof and sell your photos. The good news is that creating a photography website is easier than ever, and you don’t need to know any code.
In this guide, we’ll show you step-by-step how to create a photography website. From choosing your domain and hosting to adding your portfolio and optimizing your site, we’ve got you covered.
Is It Worth Having a Website as a Photographer?
Yes, photographers need a website to showcase their work professionally, have complete control over their photography portfolio, sell photos online, and build a lasting online presence.
Having a website for your photography lets you decide how your work is presented, which images to prioritize, and how to engage with your audience. It allows you to display your best work in well-organized galleries and create a more personal and lasting connection with visitors. Plus, depending on your website goals, you can create a photography blog, offer proofing for clients, or add an online store to sell your work with just a few simple steps.
Social media platforms like Instagram and Facebook are convenient for sharing snapshots and engaging with followers, but they have limits that can hold back your photography business:
- You’re at the mercy of algorithms that determine who sees your posts. The audience you reach may not be as targeted or interested in your work.
- You’re competing with all kinds of content, so it’s much harder for your photos to get noticed or remembered.
- Often, it’s hard to turn engagement on posts into viable attention and converting clients. Despite how tempting it is to see social engagement as success, likes and comments don’t equal money.
- Additionally, social platforms retain the right to use your images, potentially without your permission, which may pose a risk to your creative control.
To give you an analogy, social media is like public transport—quick and accessible but limited in flexibility and control. On the other hand, a website is like owning your own car—full independence to steer your photography career in the direction you choose.
Why is WordPress ideal for photographers?

We don’t give WordPress immense praise without justification; the CMS has a lot of benefits to site owners of all stripes. For example:
- It costs nothing to use, so your budget can leverage the best site publishing platform in the world for free.
- The core WordPress software is entirely usable right out of the box, but you can extend the functionality further using addons called themes and plugins. We’ll have more on this later.
- Unlike a third-party platform, social media network, or sharing site, you retain control and ownership of your content.
- You can easily use WordPress plugins to monetize your images if you wish.
- There is a massive community of users, developers, and web hosts. This means you’ll find products and services for pretty much every WordPress need you can think of.
Already have a Squarespace site? Check out our step-by-step tutorial on How to Migrate Squarespace to WordPress.
How to Build a Photography Website
Let’s dive in and see how to build a beautiful, highly functional photography website on WordPress.
Step 1: Choose Your Domain and Hosting
The first step to creating a successful photography website is choosing a domain name and hosting provider. Since you’ll be working with many high-resolution images, you’ll want a host that offers ample storage, strong performance, and scalability to ensure your site runs smoothly, loads quickly, and stays secure.
Hosting providers vary in price and features, so choosing one that fits your needs is essential. Bluehost and Siteground are affordable, managed WordPress hosting options that we highly recommend. Both offer various plans, a quick setup, and an included domain name.
The setup process is more or less the same for most hosting services, but you’ll want to follow the instructions for your chosen provider. We’ll be using Bluehost for this tutorial. For more hosting options, check out The Best WordPress Hosting for Photographers.
To start with Bluehost, visit their website and click the Get Started button. This will take you to the pricing page to Select a plan.

Next, you’ll need to choose a domain name.
Your domain name is your website’s address, which visitors will type into their browsers to find you (www.yoursite.com). A domain name has two elements: the Label and the Top-Level Domain (TLD). Consider imagely.com:
- The label “imagely” is a unique, branded word or phrase that serves as the ‘hook’. It should be memorable, easy to spell, and reflective of your photography brand. Ideally, it should match or closely resemble your business name.
- The TLD is “.com,” although hundreds of TLDs are available. While some will say that .com is necessary, we disagree. You can choose almost any relevant and suitable TLD for your site, such as “.photos,” “.photography,” and more.
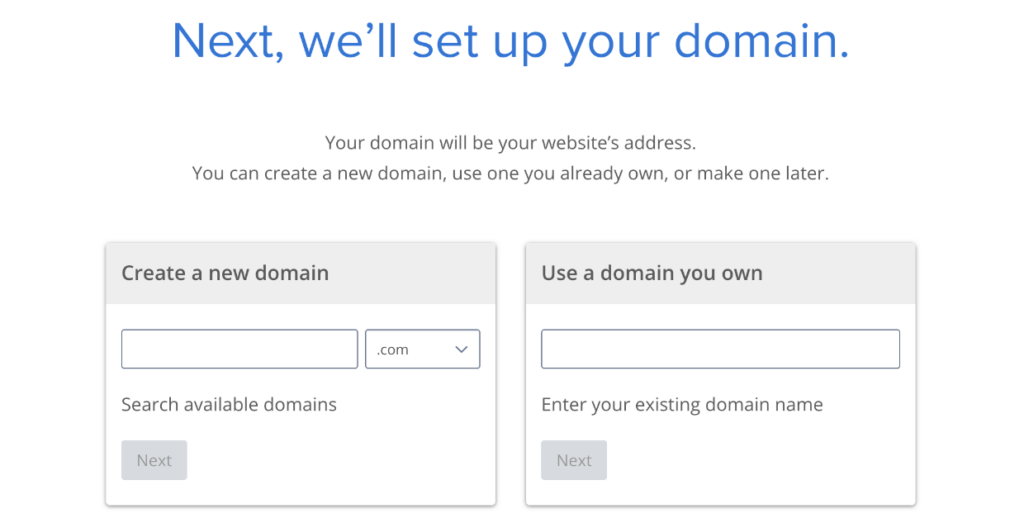
If your desired name is unavailable, Bluehost will suggest alternatives. Once you’ve selected a domain, fill in the necessary information to create your account and finish purchasing. For now, skip the optional addons since you can always tack them on later if needed.
After completing your purchase, you’ll receive a confirmation email with your login details. Your login details are for your cPanel, which is the control center for managing your hosting account, getting support, and installing WordPress.
Step 2: Install WordPress
The next step is to install WordPress. Depending on your hosting plan, WordPress may already be installed for you. However, if you need to install it manually, most hosting providers offer a one-click installation process:
- Log in to your hosting account’s control panel (cPanel). This is where you manage all aspects of your website.
- In your cPanel dashboard, look for an option to Add Site. In Bluehost, this button is under the Websites tab.
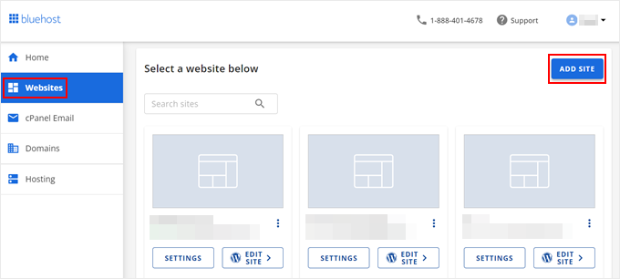
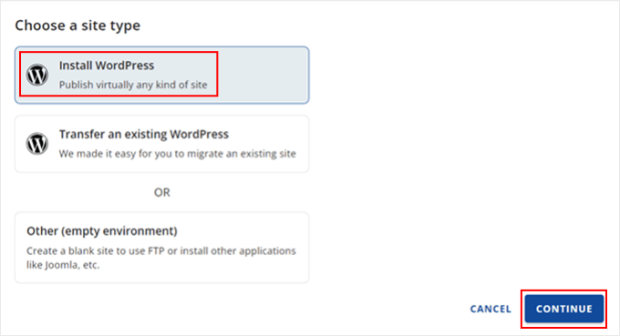
If asked to choose a site type, press Install WordPress. Go through any additional steps, such as entering a title for your site. After that, your hosting provider will install WordPress within a few minutes.
Once the installation is complete, you can log into your WordPress dashboard by returning to the list of websites in your cPanel and clicking Edit Site. Or, go to www.yourdomain.com/wp-admin/ and log in to your site using your admin username and password.
This dashboard is your central hub for managing your website, creating pages, adding plugins, and customizing your site’s design. Now, you’re ready to start building your photography website.
Step 3: Choose the Right Theme and Plugins
WordPress’ core functionality is extendable, which is a big benefit of using the platform. Themes and plugins help you create a website that matches your vision and requirements without the need for code.
Think of a theme as the ‘skin’ for your site. Although a theme may provide other functionality, it primarily controls your website’s overall appearance and feel. Your site will have a basic theme by default, but you’ll likely want to switch to something more visually appealing. WordPress offers a vast selection of free and premium themes, but choosing one specifically designed for photographers is crucial.
Building Your Photography Website with Imagely
A premium theme will give you better support, more frequent updates and improvements, and more functionality. It generally provides a better experience all around. While thousands of premium themes are available, we want to introduce you to one of the best themes for photographers:
Imagely’s Pro plan includes the Imagely theme and the NextGEN Gallery Pro plugin, which is everything you need to make a photography website.
The Imagely Theme
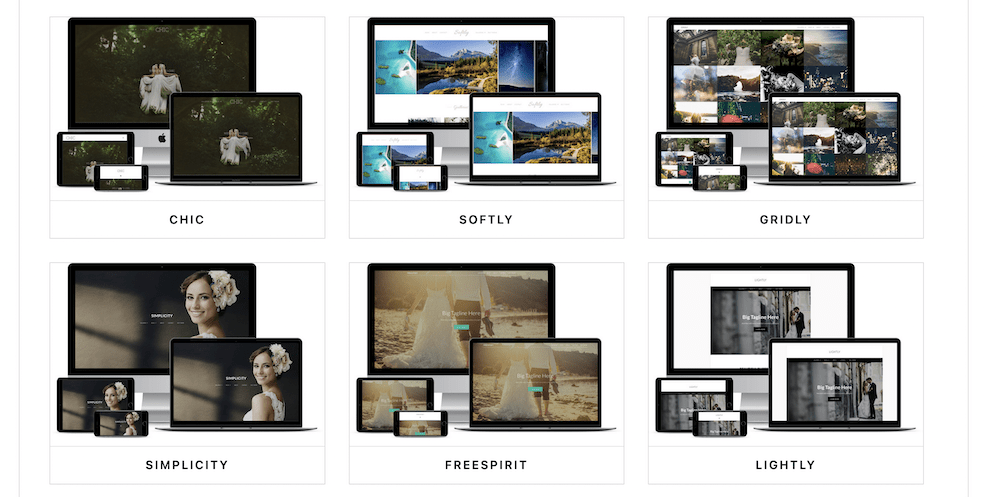
The Imagely theme is our take on what a photographer needs for a WordPress website, offering beautiful, professional designs that make it easy to showcase your work.
- Over 84 pre-designed layouts: You’ll have access to a wide range of photography website templates, helping you to quickly get your site up and running.
- Customization without coding: Adjust fonts, colors, and layouts to fit your brand.
- Mobile-responsive design: Ensures your photography site looks stunning and functions smoothly on any device.
- Seamless gallery integration: The theme is built to work perfectly with NextGEN Gallery, giving your site gorgeous galleries and advanced functionality such as built-in eCommerce with automated print fulfillment, client proofing, Adobe Lightroom integration, and lots more.
NextGEN Gallery
The NextGEN Gallery plugin offers everything you need to manage, display, and sell photography. It has a built-in lightbox and many customizable gallery layouts like mosaic, masonry, tiled, and more. Building beautiful, responsive galleries is a snap, and the plugin is packed with powerful features.
- eCommerce: Use the built-in eCommerce system to create pricelists, add coupons, and sell digital downloads or prints with automated print fulfillment from your own online store.
- Client proofing: Create galleries for clients to select proofs and share feedback.
- Adobe Lightroom integration: Upload and sync your photos directly from Lightroom to your WordPress site.
- Image protection and watermarking: Disable right-click downloads and automatically add a watermark to images while preserving originals.
- Albums: Use albums to organize and display multiple galleries.
- Social sharing and commenting: Increase engagement by adding social sharing buttons and enabling comments on images, galleries, and albums.
- Image optimization: Improve SEO and site speed with automatic resizing, lazy loading, gallery pagination, and deep linking.
- Advanced design elements: Easily add animations, hover-captions, and frontend search functionality to galleries.
- And more!
With Imagely, you get the complete package: a customizable photography theme, a powerful gallery plugin, and Adobe Lightroom integration—all designed to help you create a professional, functional photography website.
Installing Your Theme
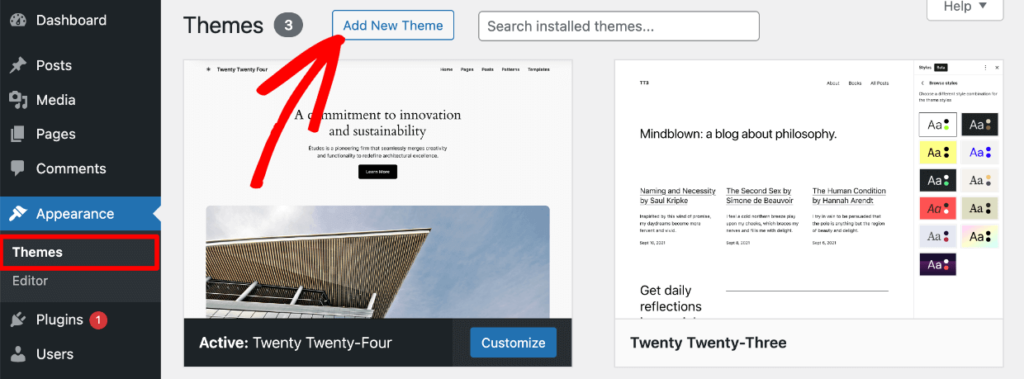
Whether you choose Imagely or any other WordPress theme, you’ll need to install it on your site. To do this, go to Appearance » Themes from your WordPress dashboard and click Add New Theme at the top.
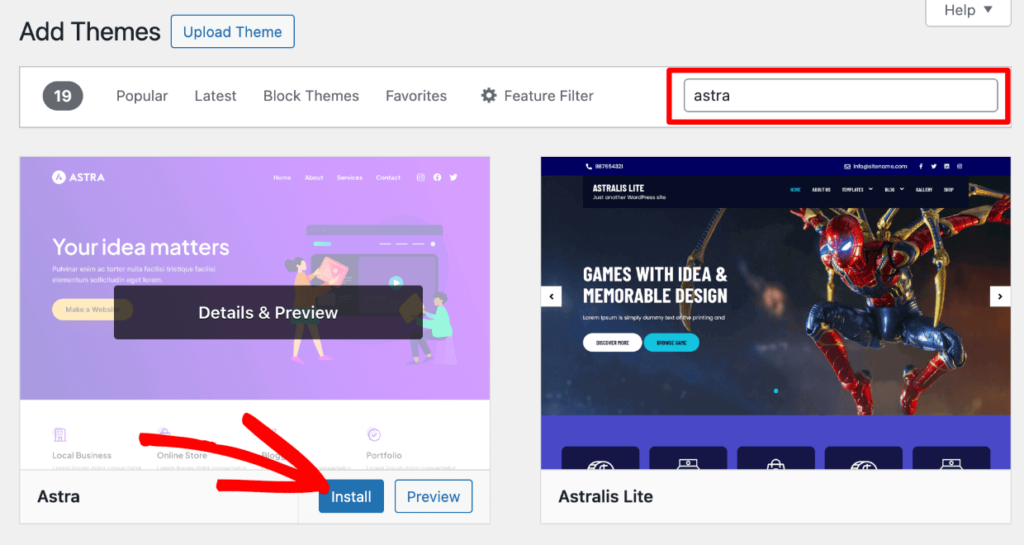
If opting for a free theme, use the search bar or filters to browse themes. When you find the one you want, hover over it and click the Install button. After a few seconds, the button will change to say Activate. Click it.
If you’re using a premium theme like Imagely, make sure you’ve downloaded the theme’s zip file after purchase. Then, click the Upload Theme button in WordPress and add your theme’s zip file. Press Install Now.

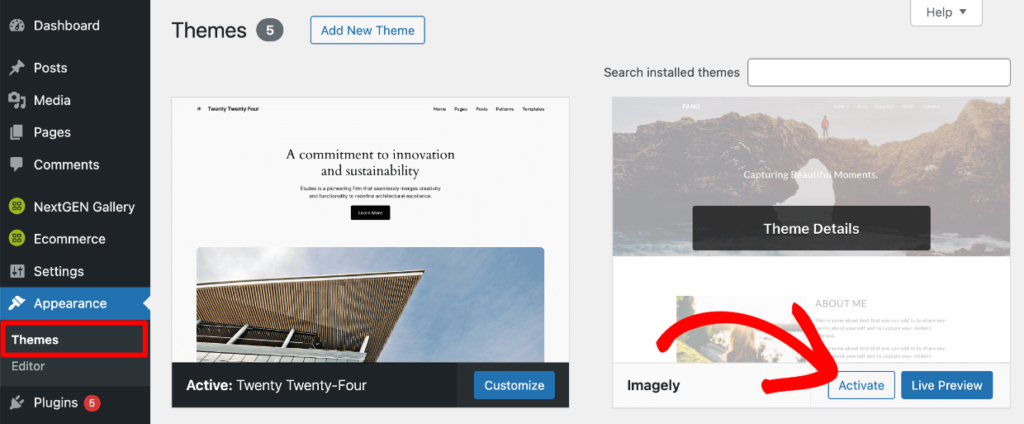
Once installed, click the Activate Theme link on the next screen. Or, head back to Appearance » Themes. You’ll now see your premium theme listed here, and you can press the Activate button.
You can read our documentation for more information on installing the Imagely theme.
Prefer to use a website builder to create your own custom theme? Check out SeedProd. It’s our favorite drag-and-drop website builder for photographers. You can also check out our comparison of the best photography website builders.
Installing Plugins
Next, you’ll want to install the NextGEN Gallery plugin. This is required if you’re using the Imagely theme, but you’ll want to add it regardless of which theme you’re using.
First, go to Plugins » Add New and search for NextGEN Gallery. This is the free, base version of the plugin. Press Install Now and then Activate when the button changes.
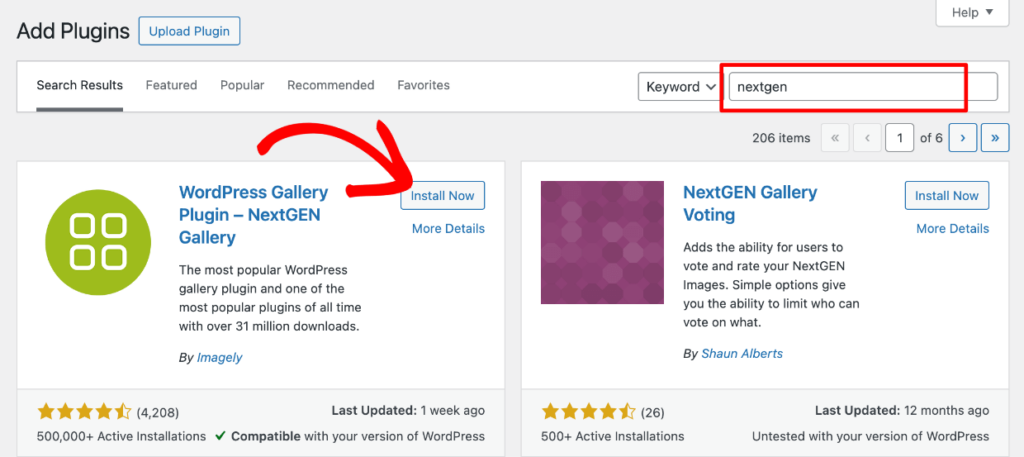
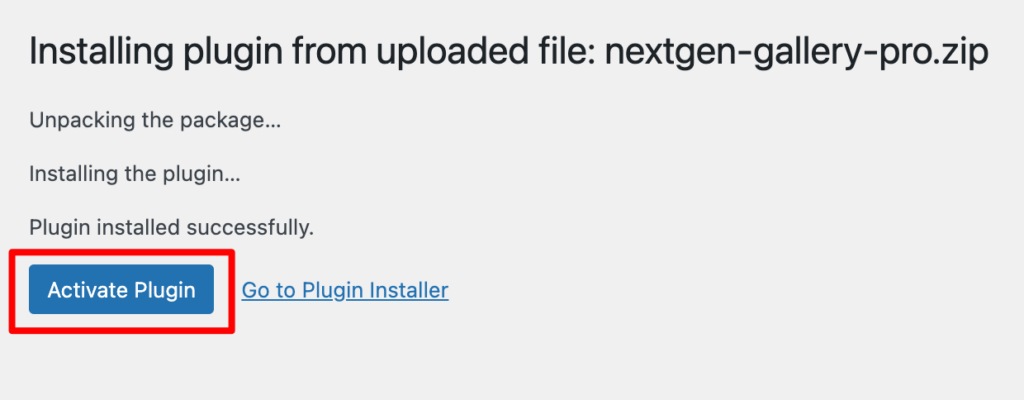
If you purchased a premium version of NextGEN Gallery, click Upload Plugin at the top. Then, Install and Activate the plugin’s zip file.
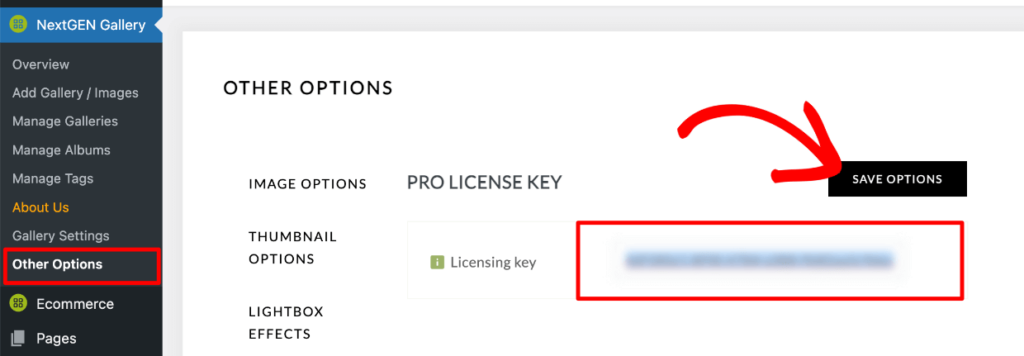
Once activated, click NextGEN Gallery » Other Options and go to the Pro License Key tab at the bottom of the menu. Enter your license key (found in your Imagely account area or purchase confirmation email) and press Save Options.
NextGEN Gallery Pro is now fully set up and ready to use! If you need additional help, check out our documentation.
Aside from NextGEN Gallery, here are a few other plugins we recommend installing:
- WP Super Cache: A free plugin that speeds up your website by creating static copies of your pages.
- Duplicator: A backup plugin that automatically creates scheduled backups of your entire site.
- AIOSEO: A powerful SEO plugin that helps your photography website rank higher in search engine results.
- MonsterInsights: An easy-to-use Google Analytics plugin that lets you track website traffic and visitor behavior within WordPress.
- WPForms: A drag-and-drop form builder that makes it simple to add contact forms, surveys, booking forms, and more to your site.
Step 4: Customize Your Theme and Add Content
With your theme installed, the next step is to customize it and start adding content to your site. This is where you can really make it your own by adjusting the design to match your brand and adding essential pages that provide visitors with key information about you and your work.
Importing Theme Designs
One of the biggest advantages of using a photography-specific theme like Imagely is how fast and easy it is to get a beautifully designed site up and running.
To import any pre-built Imagely theme layouts, click the Imagely Settings from your WordPress admin menu. This screen will show you many theme templates (demos). Hover over the one you want and press Import Now.
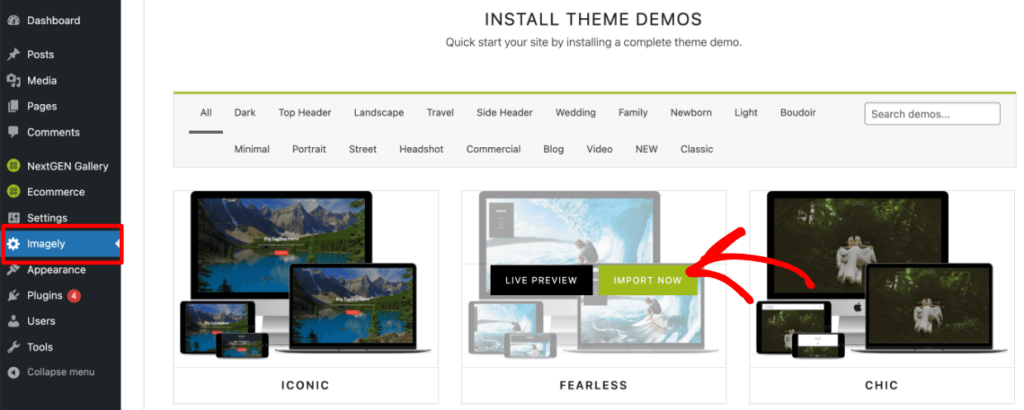
You’ll see a popup with a list of plugins needed (NextGEN Gallery Lite, the Pro plugin, and Kadence Blocks). Go ahead and install any that are missing.
Press Go to the Next Step, then select the template content you want to import. When you’re finished, click Install This Demo.
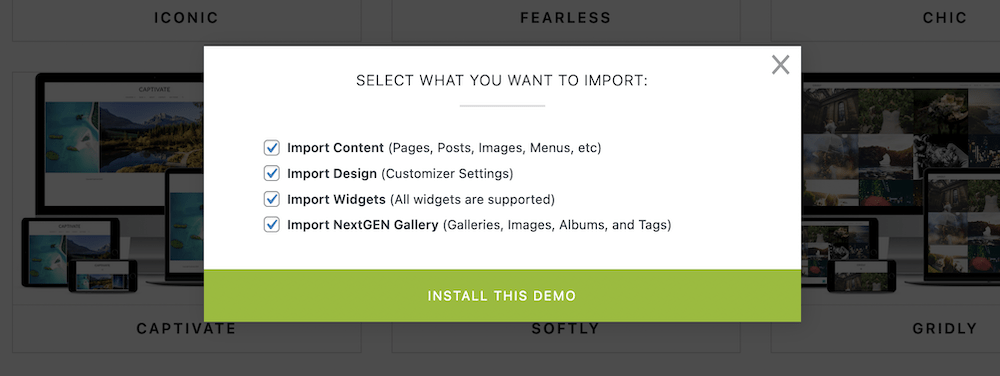
Depending on your import settings, this may take some time. You can see our documentation for more information on theme designs.
Customizing Your Theme
After activating any WordPress theme, you’ll want to customize it. Head to Appearance » Customize from your WP dashboard.
- Adjusting Fonts and Colors: Under Global, you can personalize the typography and color scheme to reflect your brand and photography style.
- Adding a Logo and Branding: Add a custom site title, tagline, and logo under Global » Site Identity to give your site a professional touch.
- Customizing the Layout: Easily adjust your site background, page layout, sidebar, and more under Global » Site Layout.
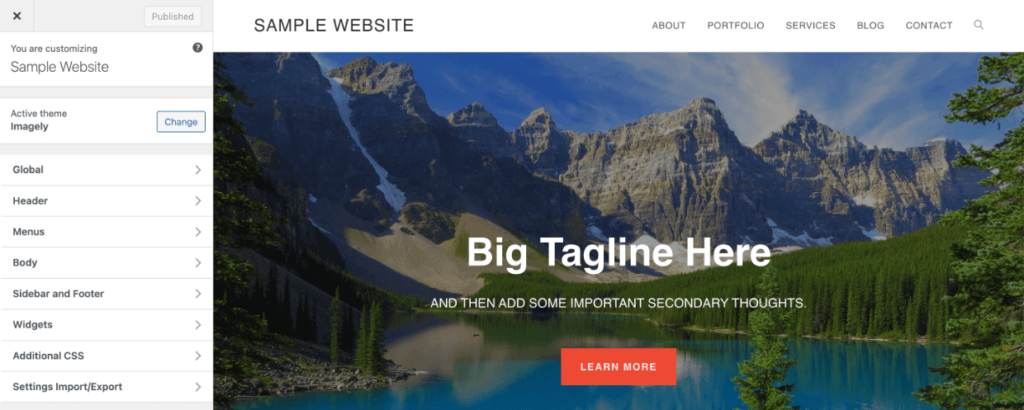
The customizer has many options, and we won’t go into all of them. Play around with the various settings to adjust your menu layout, header, footer, colors, fonts, and more. Make sure to click Publish at the top to save your changes.
Adding Essential Pages
A well-structured website should include key pages that provide visitors with all the necessary information about your photography business. If you imported an Imagely demo design, you’ll already have some essential pages created.
You can create, edit, and delete pages by clicking Pages in your WordPress dashboard menu. Here are the most important pages to add:
- Home Page: Your home page is the first thing visitors will see, so it should make an impact. Feature your best work and make it easy for users to navigate to other areas of your site.
- About Page: This page is where you can introduce yourself to potential clients. Share your story, your photography style, and what inspires your work. It’s also an excellent place to highlight accolades, certifications, or notable clients.
- Contact Page: Make it easy for visitors to get in touch with you. Include a contact form or your email address, phone number, and any social media links.
- Portfolio: This is where you’ll showcase your photography work in a gallery, which we’ll show you how to do in the next step.
- Services or Pricing Page: If you offer photography services like portrait sessions or event photography, create a dedicated page to showcase your services. Include pricing information or encourage potential clients to reach out for custom quotes.
The official WordPress site has a fantastic resource to help you add pages and work with them in the Block Editor.
Setting Up Your Menus
Once your pages are added, you’ll want to create a navigation menu to make it easy for visitors to move through your site. Your menu bar should be straightforward, lean, and uncluttered.
Go to Appearance » Menus in your WordPress dashboard to set up your main navigation. Add links to your most important pages—like Home, About, Portfolio, and Contact—and arrange them in the order you want them to appear.
We recommend organizing it in tandem with visitor behavior. For example, putting the Portfolio and Services links before your Contact page makes sense.
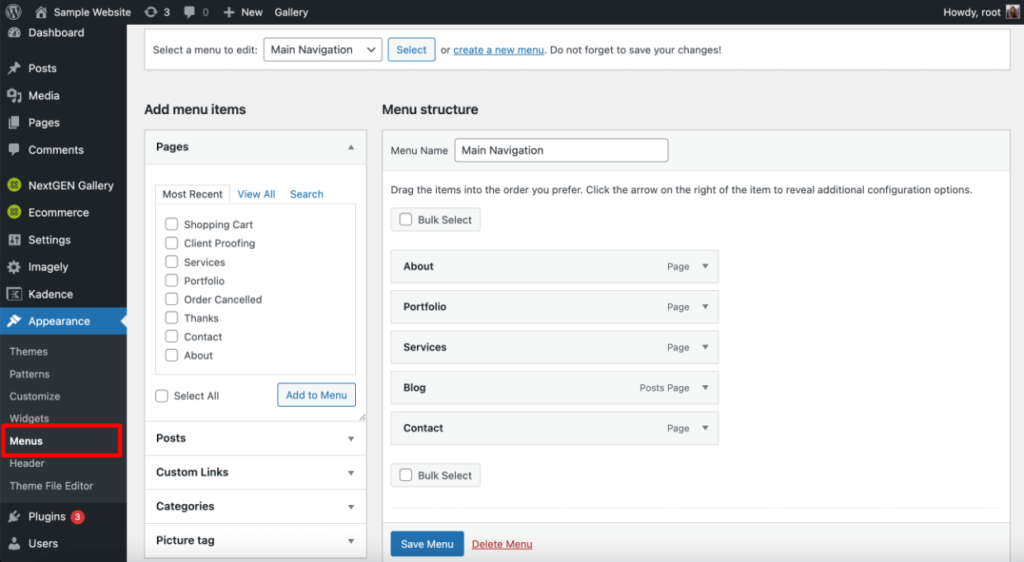
Your website is now taking shape. Next, we’ll focus on creating and showcasing your portfolio.
Step 5: Create and Showcase Your Portfolio
With your theme installed and customized, it’s time for the fun stuff! Your portfolio is where you’ll display your work in stunning galleries that reflect your style and professionalism.
WordPress’s default setup doesn’t give you many options to add and work with images, but fortunately, NextGEN Gallery is the perfect tool for creating and managing your portfolio. It’s a photography site’s secret weapon, helping you streamline your photography workflow and display photos in a dynamic and interactive way.
If you followed the earlier steps, you’ll already have the plugin installed and activated.
Creating a New Gallery
You can create and manage galleries using the menu items under NextGEN Gallery, or you can do it from a page or post. Since we’re creating a gallery for our portfolio page, we’ll do it from there.
Navigate to Pages » All Pages and select or create your Portfolio page. Now, you’re in the WordPress editor. Click the + sign to add a new block and search for/select the NextGEN Gallery block.
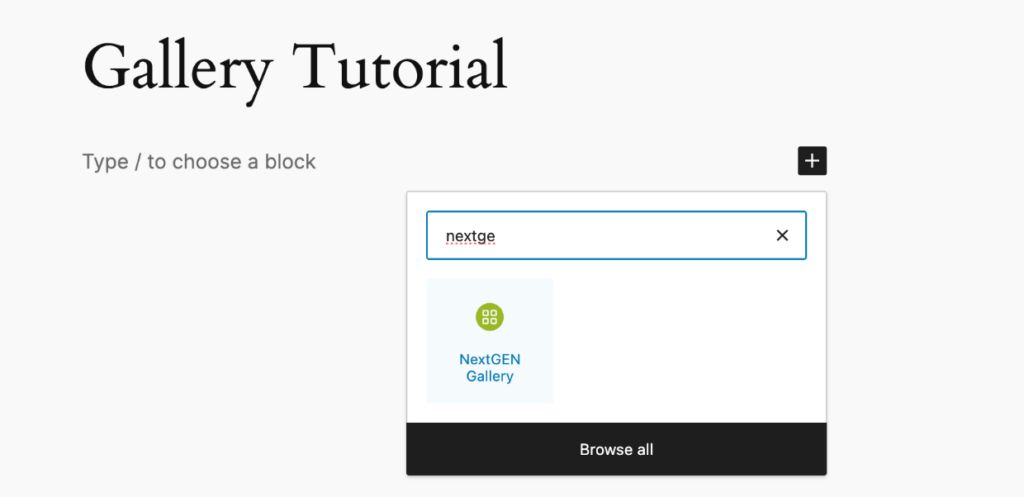
You can then click the button inside the dialog box that says Add NextGEN Gallery, which will open a popup window.
From there, click Upload Images. Choose Create a New Gallery from the drop-down menu, give your gallery a name (e.g., “Landscape Portfolio), and press Create and Select. Use the Browse button or drag and drop the images you want to upload. When you’re ready, press Upload Files at the bottom.
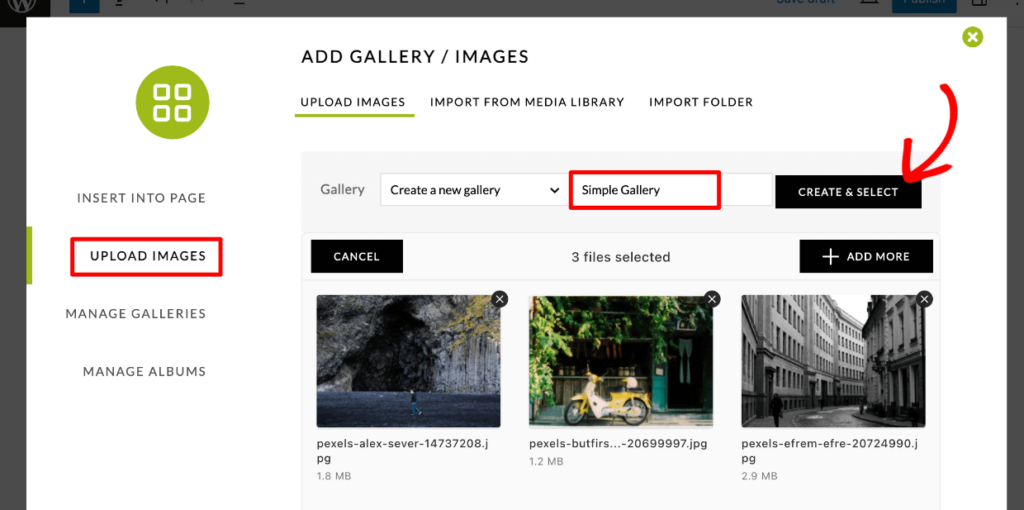
You can use the Manage Galleries tab to add metadata and descriptions to your images, adjust thumbnails, and more.
To customize your layout, click Insert Into Page. Go ahead and choose the gallery you just created under Select a Gallery and pick from the variety of gallery layout templates. There are other settings under Customize Display Settings as well.
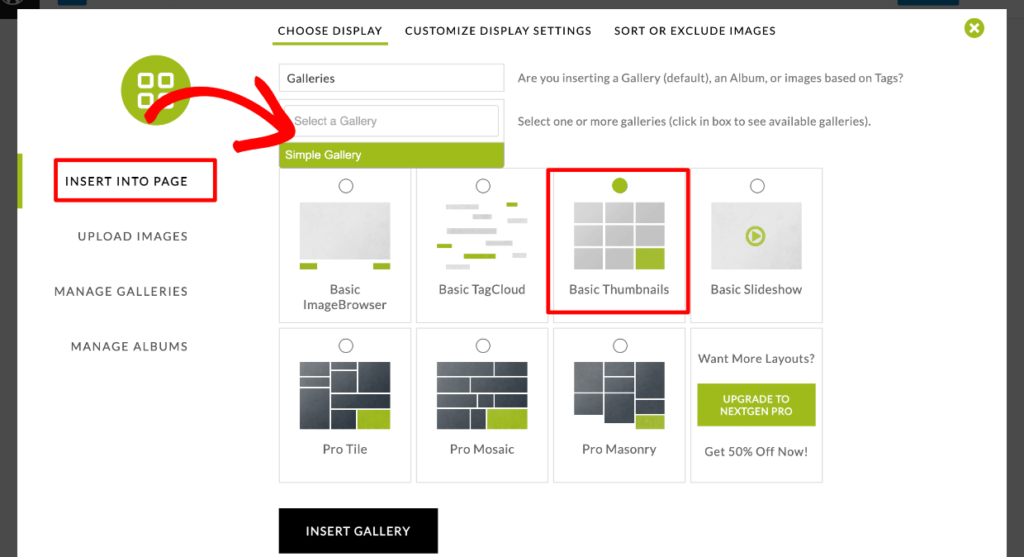
For the sake of this tutorial, we’ll go ahead and click Insert Gallery.
Further customization is available under NextGEN Gallery » Gallery Settings, where you can tweak individual gallery types. NextGEN Gallery » Other Options is where you’ll find more technical settings, such as dimensions for image resizing, user roles, and cache management.
Once your gallery is added to the page, you can use WordPress’s Preview in New Tab button to see how it looks. Make sure to press Publish or Save when you’re done.
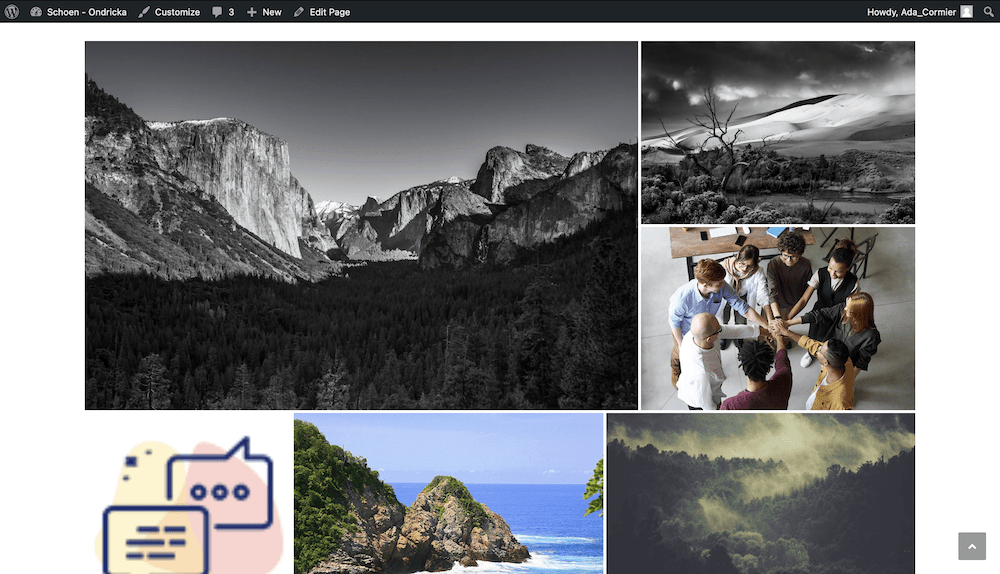
Head to this documentation for more detailed instructions on creating your first gallery.
Advanced Features for Your Portfolio
The above steps allow you to create a simple gallery for your portfolio. However, if you’re using a paid version of the plugin, you’ll want to enhance your galleries’ functionality with more advanced features. Check out the following articles to learn more:
- How to Create Albums
- How to Set Up a Client Gallery for Online Proofing
- How to Sell Your Photography On Your Website
- How to Add Frontend Image Search to Galleries
- How to Add Social Sharing, Commenting, and More in the Pro Lightbox
Final Tips to Create a Photography Website that Attracts Clients
Now that your website is nearly complete, here are a few final tips to ensure it’s polished, professional, and fine-tuned for success.
1. Make Sure Your Site Loads Fast
When a visitor hits your site, it needs to be lightning-fast. A slow site is akin to a closed store. Don’t believe me? Google reports that most people will leave a site if it takes more than 3 seconds to load! You can use a tool like Google’s PageSpeed Insights to determine how fast your site loads.
Optimize your images and only load images when necessary on scroll. NextGEN Gallery helps with this as it has built-in lazy-loading and allows you to automatically resize and compress images for display while preserving originals for print sales and digital downloads.
2. Ensure Your Site Is Mobile-Responsive
Gone are the days of, “This website is best displayed on Internet Explorer.” Nowadays, most internet traffic comes from mobile devices, and users expect a website to be fully responsive and mobile-friendly.
Almost any theme worth its salt will have a responsive design and offer mobile optimizations. However, testing your site on different devices is still a good idea. If something doesn’t look right, adjust font, image, and layout sizes to ensure a seamless experience for all display sizes.
3. Nail the User Experience (UX)
We’ve all come across websites that are infuriating to use. Your goal is to ensure your site is far, far away from that category, which means having an excellent UX (user experience). There’s a lot of jargon around UX and how to craft a wholesome experience for visitors. However, a lot of it boils down to these vital elements:
- Simple and Clear Navigation: Place your main menu somewhere that makes sense. It’s often in the header along the top of the page, but a sidebar or slide-in menu can also work as long as it’s easy to find and follow.
- Intuitive Direction: Have a clear direction for what you want the visitor to do. For example, if you want them to look at your portfolio, include a prominent link or button on the home page. In contrast, if the most important element is your list of services, lead with that and a CTA to book a session.
- Keep Clicks to a Minimum: You want visitors to click as few times as possible. Whether contacting you, signing up for a newsletter, or purchasing a print, try to keep the number of clicks needed to get from a page to a desired action to 3 or fewer.
Once you have these in place, the rest will follow. Most photography sites aren’t too complex. By focusing on these elements, you’ll have covered most of the necessary bases to ensure a rock-solid UX. Check out Photography Website Design: Expert Tips to Stand Out Online to learn more.
4. Keep Your Portfolio Up to Date
Your portfolio is the heart of your photography website, so keeping it current with stellar work is crucial. How you do this is up to you, but we recommend setting a schedule to regularly review your portfolio, remove any outdated photos, and replace them with fresh, standout shots.
Your portfolio is a highlight reel of your work. As such, it should showcase the absolute best you can offer. You can afford to be ruthless—quality trumps quantity. If a photo doesn’t wow you, it won’t impress your audience either.
5. Focus on SEO
Optimizing your website for search engines can significantly increase traffic to your site.
- Use an SEO plugin like AIOSEO or Yoast SEO to optimize your site and content.
- Add alt text to all images for better accessibility and search engine rankings.
- Enable deep linking in NextGEN Gallery to improve gallery and image SEO performance.
- See our SEO guide for photographers to learn more.
You made it to the end! As you can see, building a photography website doesn’t have to be daunting. Now’s the time to launch your portfolio website and let your work shine.
Throughout this post, we’ve shown you how to create your photography website using a few of the most popular tools. WordPress is the ultimate publishing platform, the Imagely theme is tailor-made for photographers, and NextGEN Gallery Pro gives ultimate functionality and a flexible way to display images. It’s the perfect trio for building your site and showing off your photography.
If you liked this article, you’ll also want to read How to Get Photography Clients: 10 Proven Strategies.
Don’t have NextGEN Pro yet? Get started today!
Did this post inspire you to create a photography website? Let us know in the comments below! For more photography tips and WordPress tutorials, check out our blog.

