Tired of spending hours editing your photos, only to feel like you're not making much progress? We've been there, and now, we're here to get you out of your editing funk and into your flow.
In this ultimate Lightroom workflow guide, we'll provide a step-by-step Lightroom tutorial for beginners, covering everything from importing and organizing your images to mastering the Develop module. We'll also share advanced techniques to speed up your process and the best practices for building your own workflow.
So, let's get to it.
What is a Lightroom Workflow?
A Lightroom workflow is a systematic approach to managing and editing your digital photographs within Adobe's Lightroom software. It covers everything from importing your images to making various adjustments and enhancements, and finally exporting or sharing the finished product. With a well-defined workflow, you can focus on your creative vision instead of getting bogged down by repetitive tasks or disorganization.
Quick Overview of Lightroom's Modules
Library Module
- Purpose: Organize and manage photos
- Tasks: Import, cull, rate, categorize
- Features: Collections, keywords, metadata
- Editing: Apply presets, perform basic adjustments
Develop Module
- Purpose: Edit and enhance photos
- Tools: Global settings, local adjustments
- Advanced Features: Lens corrections, camera calibration, creative profiles
Additional Modules
- Book Module: Design and layout photo books
- Slideshow Module: Create multimedia presentations
- Print Module: Use template and layouts for printing
- Web Module: Arrange photos in web layouts
Workflow: Lightroom Tutorial for Beginners
1. Import Photos into Lightroom
Alright, let's dive into the first step in your Lightroom workflow: importing photos into Lightroom. It's super important to set up your import preferences correctly from the get-go. This ensures your photos are organized and backed up properly.
We'll be using Lightroom Classic, but the process is more or less the same for LR CC. To start, open the Library module in LrC and select Import at the bottom of the left column.
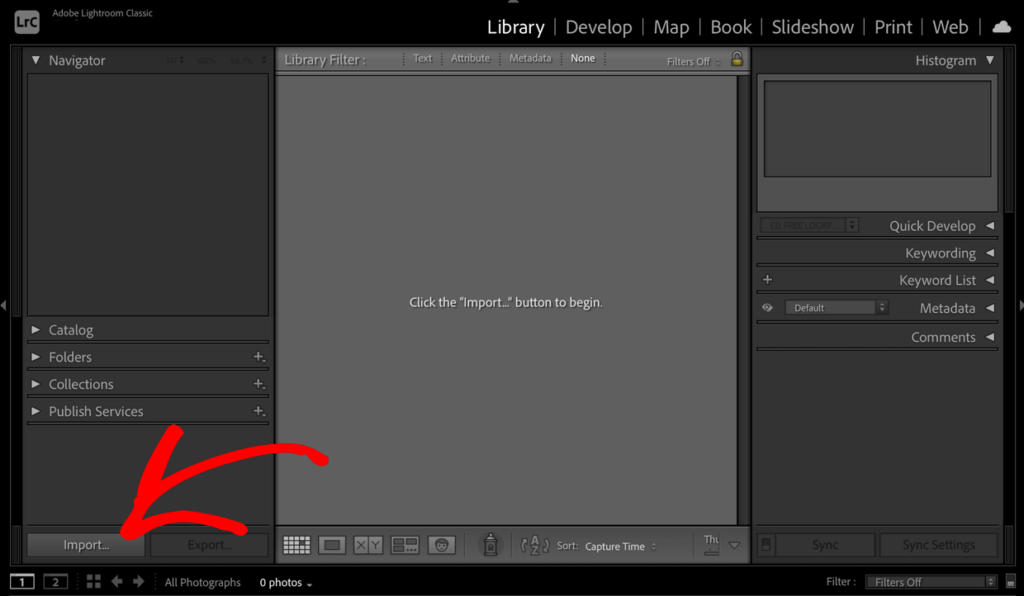
During the import process, Lightroom offers various options to help you organize your photos. One recommended approach is to create a folder structure based on the date or event. This makes it a breeze to locate specific photo sets later on. Just set your structure under Destination in the right panel.
You can also apply metadata presets, keywords, and develop presets during import to streamline your workflow even further. Talk about a time-saver!
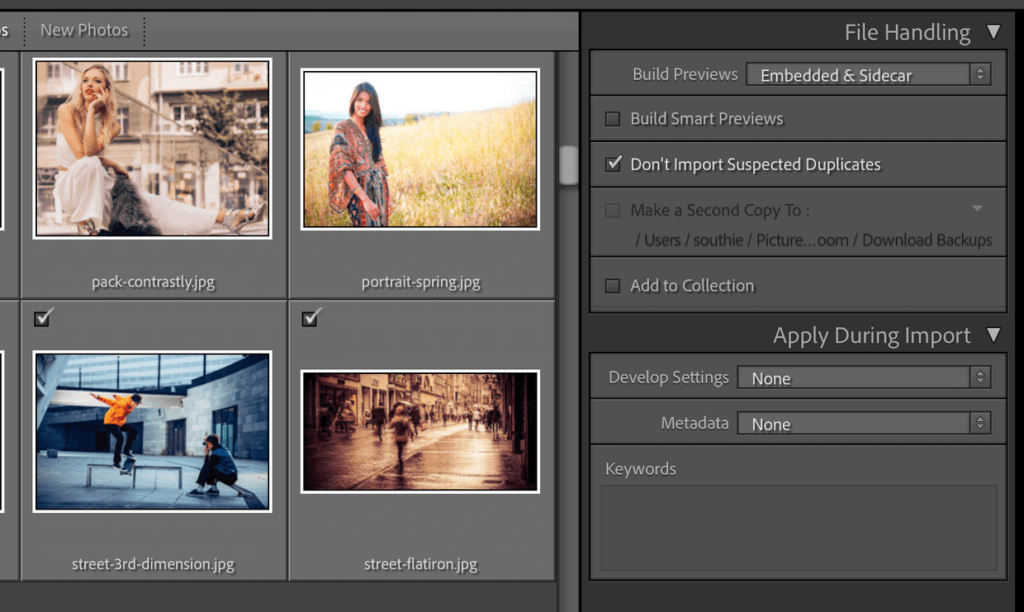
Now, backing up your photos is a step you should never, ever overlook. Lightroom allows you to create a backup copy of your photos during the import process, either on the same drive or a separate backup location. This way, you have a copy of your original files in case of any data loss or corruption. Just ensure that Make a Second Copy To is checked and select a backup location. Better safe than sorry, right?
When you're finished, click Import in the bottom right. Taking the time to set up your import preferences correctly can save you countless hours down the line and help maintain a well-organized and efficient workflow.
2. Cull and Organize Images
Now that your photos are imported, it's time to cull and organize them. Efficient culling is key to streamlining your Lightroom workflow. Start by switching to the Library module's Loupe View mode, which lets you quickly scan through images using keyboard shortcuts (you can press E to enter this mode).
Then, assign flags, ratings, or color labels to separate your selects from rejects. For example, use the P key to flag picks, X to reject images, and 1-5 to assign ratings.
When you exit Loupe mode, Lightroom make it easy to see the attributes you assigned to each photo. You can use Filtering to narrow down your selection by star rating, flags, metadata, and more to focus on your best shots.
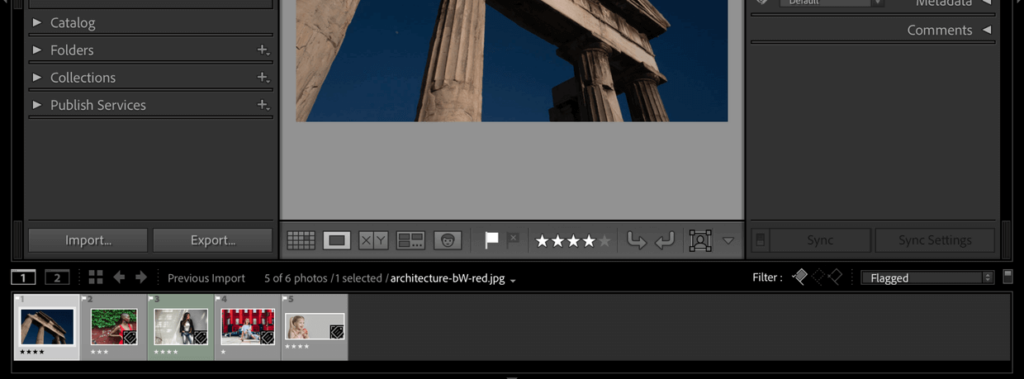
Collections and smart collections are powerful organizational tools too. Create collections to group related images, and smart collections to automatically populate based on rules you define.
Pro Tip: Consider culling images before importing into Lightroom to save disk space and improve performance. Apps like Photo Mechanic or Adobe Bridge can help you quickly preview and discard obvious rejects before import.
2. Edit Photos in the Develop Module
Alright, it's time to work some magic in the Develop module. This is where you can transform your raw images into works of art. You'll want to complete each editing "round" for every photo before moving on to the next.
Round 1: Basic Adjustments
The first step is to get the perfect negative by making global adjustments. Under the Basic tab in the right panel, adjust White Balance, Exposure, Contrast, Highlights, Shadows, Whites/Blacks, and Saturation/Vibrance using sliders on the right panel.
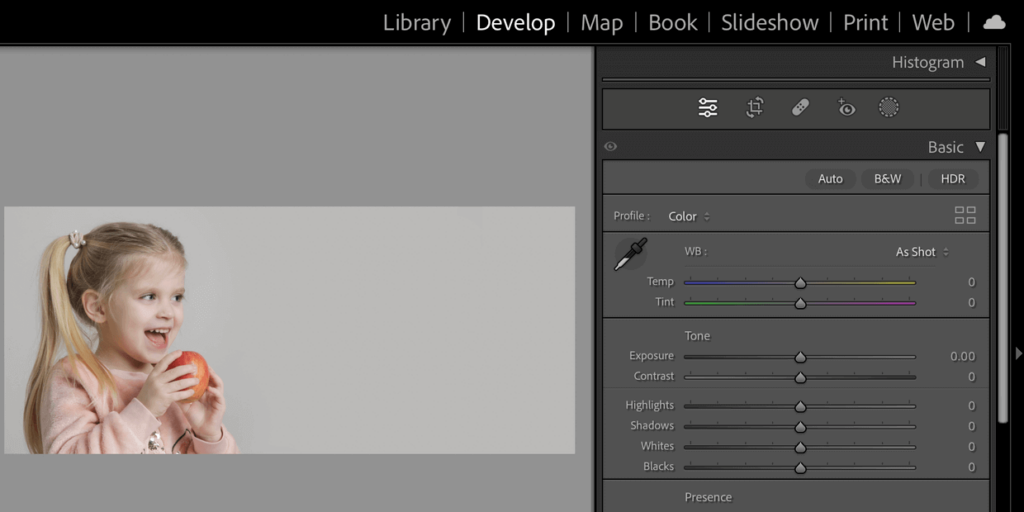
In the Detail tab, adjust Sharpening and Noise Reduction. If you need to apply cropping, you can do that under the Transform tab. You can also manually adjust the perspective and transform the image to fix converging lines or level the horizon. Say goodbye to wonky photos!
Another feature in the Develop module is the ability to apply Lens Corrections and perspective adjustments. Lightroom can automatically detect the lens profile and apply corrections for distortion, vignetting, and chromatic aberration.
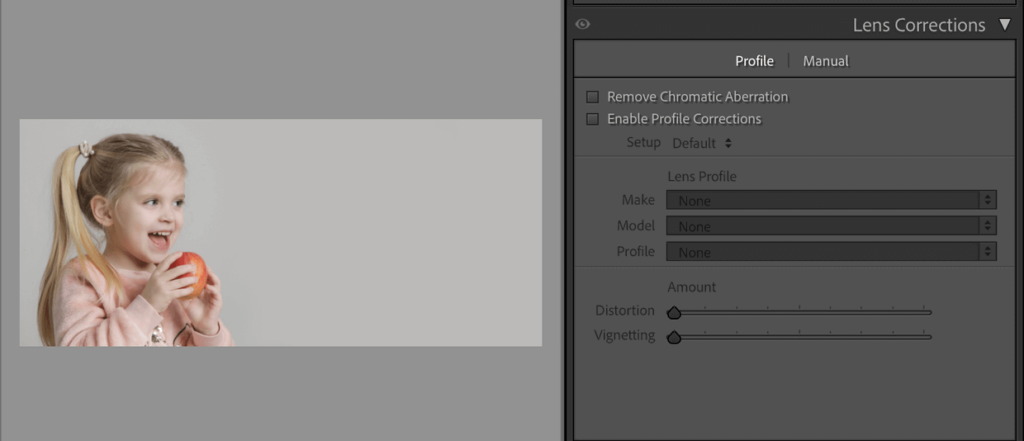
Once you've edited all your photos, creating the ideal negative, it's time to move on to the second round.
Round 2: Creative Adjustments
This next round of editing involves creative adjustments that are applied to the entire image. One powerful technique is using presets, which are pre-defined settings that can be applied with a single click. Lightroom comes with built-in presets, but you can also create and install third-party presets. Access your Presets using the drop-down menu on the left.
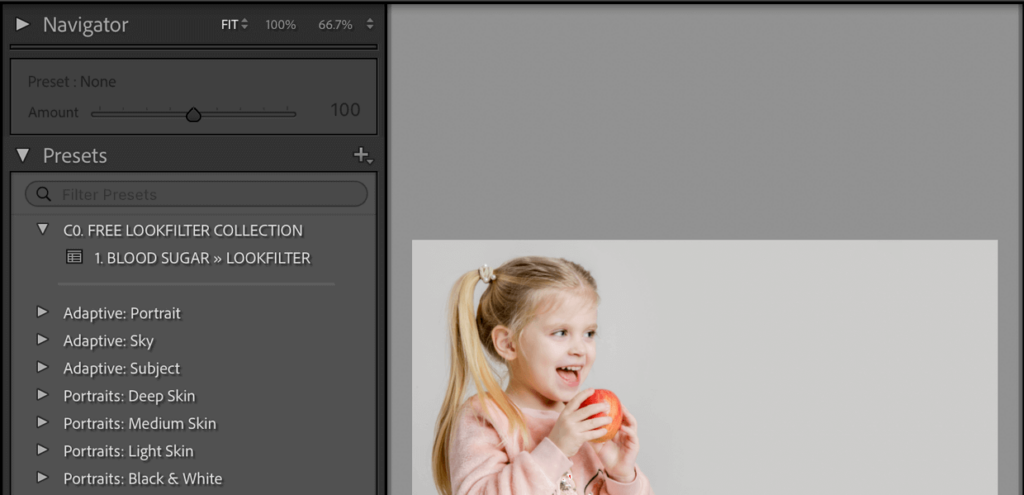
Lightroom's Develop module offers a ton of creative adjustment tools. For example, you could convert an image to black and white or manipulate the contrast and colors using Tone Curve.
Split-toning (under the Color Grading tab) is a creative color grading technique that adds different hues to the highlights and shadows of your image and allows you to fine-tune the hue, saturation, and balance to create a distinct mood or stylized effect. Color grading, in general, is a powerful way to enhance the overall color and tone of your images, whether you're aiming for a cinematic, vintage, or any other desired aesthetic.
Other creative adjustments include Camera Calibration and Creative Profiles. These profiles are designed to emulate the look and feel of different camera models, film stocks, or creative styles. Lightroom comes with a variety of built-in profiles, but you can also create your own custom profiles or download third-party options to achieve a unique look.
Once you've finished applying whole-photo creative adjustments on all your images, move on to round 3 for the nitty gritty edits.
Round 3: Local Enhancements
Now that all your photos are in a good spot overall, let's talk about Lightroom's local editing tools. These tools allow you to make selective edits to specific areas of your image, enhancing or correcting specific details without affecting the entire photo.
The most obvious one is the Brush tool, which gives you precise control over exposure, colors, and more. Press K to enable the brush, adjust the size and other settings in the panel, and begin painting adjustments onto specific areas of your photo. You can also find the brush under the Mask icon at the top of the panel (looks like a circle).
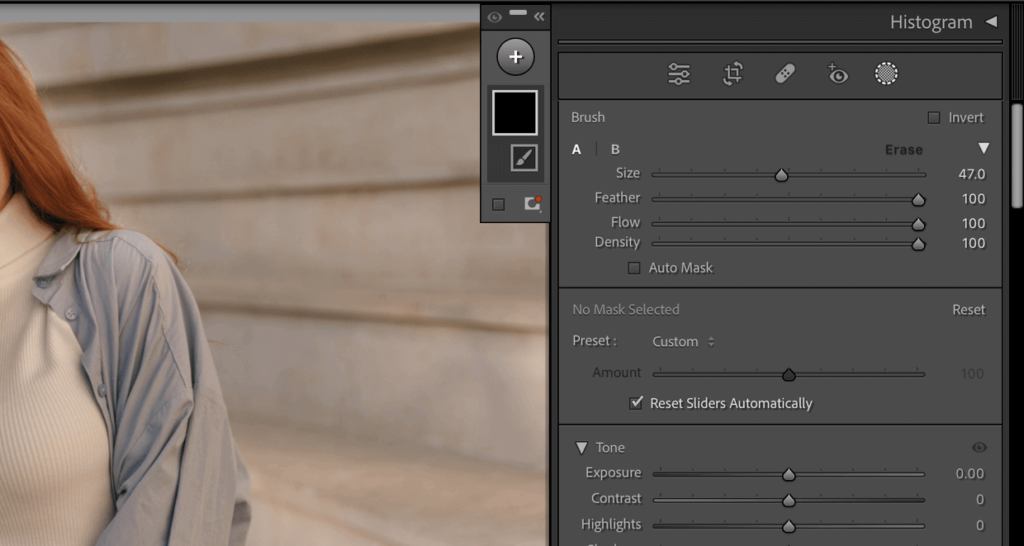
Also under the Mask panel, you'll find Graduated and Radial Filters for more controlled local adjustments. The Graduated Filter (press M to enable) mimics the effect of a graduated neutral density filter, allowing you to apply exposure, color, or other adjustments that gradually increase or decrease across the image.
The Radial Filter (press shift+M to enable) applies adjustments in an elliptical shape, perfect for vignetting or drawing attention to specific subjects.
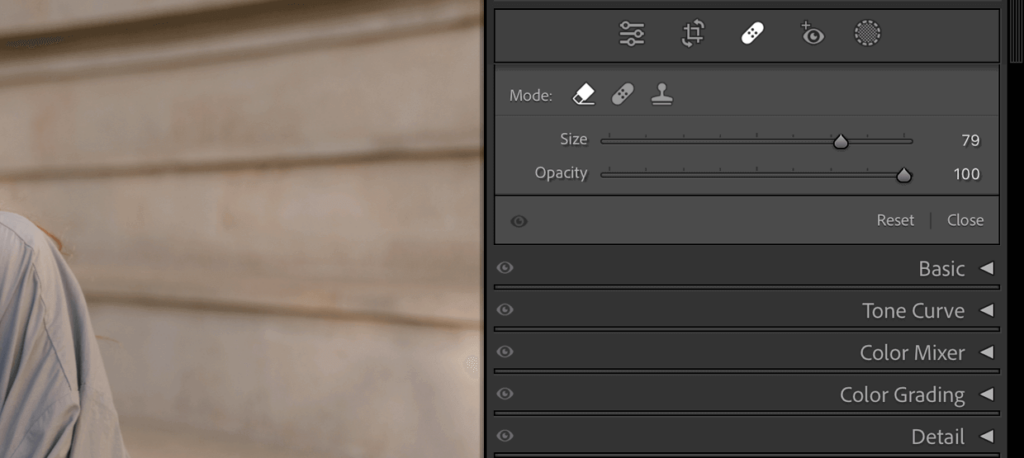
Another powerful tool for local enhancements is the Healing tool, which enables you to seamlessly remove unwanted elements like dust spots or blemishes. Press Q to enable it or click the bandaid icon in the main panel.
It will enable the Content Aware Removal mode by default. However, for more intricate blemish removal such as objects with details or textures, switch the mode in the healing panel to Heal (bandaid icon) or Clone (stamp icon), which both provide more precision.
Go through all your photos and apply local adjustments as needed. Once you're finished, it's time to export your photos!
3. Export and Share Your Photos
You've put in all the hard work, and now it's time to share your photos! Lightroom is non-destructive, which means your edits won't be applied until they're exported.
First, select the images to export and click File » Export from the top menu bar. Now, you can configure the export settings such as file format, image sizing, and automatically renaming exported files. You'll also choose the location to export your photos to, which brings us to the point in the article where we get to tell you all about Imagely's cool Lightroom features!
Lightroom Integration to Supercharge Your Workflow
Want to take your Lightroom workflow to the next level? Imagely is the official home of NextGEN Gallery, the most popular and powerful WordPress plugin for photographers. The plugin has seamless integration with Lightroom, meaning you can easily create and manage your WordPress galleries, share photos for proofing, and keep everything in sync straight from Lightroom.
Look no further than ImagelyNextGEN Gallery's seamless integration with Lightroom! With NextGEN Gallery's powerful plugins, you can easily create and manage your WordPress galleries, proof photos, and keep everything in sync straight from Lightroom. It's a game-changer for photographers who want to streamline their workflow and showcase their work online.
With NextGEN Gallery, there's no need for manual uploads or tedious file management! Simply select the photos you want to export, choose your gallery, and let the plugin work its magic. Your photos will be automatically added to your gallery, complete with metadata and any custom settings you've applied.
You can even keep your Lightroom collections automatically synced with your WordPress galleries. Edit a photo, update metadata, or rearrange your gallery, and NextGEN Gallery will ensure that your website always reflects your latest work.
Streamline Your Photography Business With Imagely Today →
Aside from Lightroom integration and gorgeous galleries, the plugin offers a built-in eCommerce system, a complete proofing platform, automatic print fulfillment, and tons of other features like watermarking and automatic image resizing. Basically, it's a one-stop shop for any photography site on WordPress.
Advanced Lightroom Workflow Techniques
Ready to take on some additional time-saving techniques and level up your Lightroom skills?
Panorama Stitching and HDR (High Dynamic Range)
Panoramas allow you to combine multiple horizontal images into a single, wide-angle shot, perfect for capturing breathtaking landscapes or cityscapes. HDR merging combines multiple exposures of the same scene, preserving details in both the highlights and shadows, resulting in images with exceptional dynamic range.
You can use these techniques separately or together with Lightroom's combined HDR Panorama function. To start using them, select the images to be combined and click Photos » Photo Merge and choose the technique you want. Panoramas and HDR open up a whole host of creative possibilities within your editing workflow.
Batch Processing and Auto-Sync
Despite being considered more advanced, batch processing and auto-sync are essential tools for streamlining your Lightroom workflow. Batch processing allows you to apply the same adjustments or presets to multiple images simultaneously, saving you from having to edit each photo individually.
In the Develop module, you can batch process using the keyboard shortcuts to Copy settings from one photo and Paste them on to another. To apply settings to multiple photos, select the photo with the edits. Then, hold down Command or Shift and select the photos to apply the edits to. After selection, press the Sync button in the right panel.

Auto-sync takes this a step further by automatically synchronizing your edits across multiple photos, ensuring consistency in your editing style. To use it, select the photos you want to keep in sync and then click the toggle to change the Sync button to Auto-Sync. Now, you can edit the selected photos and the changes will automatically be applied to the rest.
Virtual Copies and Snapshots
Virtual copies allow you to experiment with different editing styles on the same photo without duplicating the original file. Right click on any photo and select Create Virtual Copy to start using it.
Snapshots, on the other hand, capture the state of your edits at a specific point, enabling you to quickly revert to a previous version or compare different editing approaches side by side. While in the Develop module, click the + sign in the Snapshots panel on the left side to create a new snapshot.
Photoshop Integration
While Lightroom is a powerful editing tool on its own, integrating it with other software like Adobe Photoshop can unlock even more possibilities.
Lightroom's seamless integration with Photoshop allows you to send specific photos or parts of an image to Photoshop for advanced editing, such as complex retouching or compositing. Once you've finished your edits in Photoshop, the changes are automatically reflected in your Lightroom catalog, ensuring a smooth and efficient workflow.
Building Your Own Workflow
Crafting an efficient Lightroom workflow and maximizing productivity is not a one-size-fits-all. It's important to tailor the software to your specific needs. Here are some key steps to think about when building your own workflow:
Analyze Your Photography Needs
First, assess the types of photography you engage in, the volume of images you process, and the desired output formats (print, web, etc.).
Personalize the Workspace
- Customize your layout by arranging the modules, toolbars, and panels to facilitate your editing process.
- Assign customized keyboard shortcuts to frequently used tools and actions.
Use Custom Presets
Creating custom presets for common editing tasks can significantly accelerate your workflow.
Leverage NextGEN Gallery and Other Lightroom Plugins
- Integrate plugins for batch processing and advanced noise reduction to extend the software's functionality.
- Use virtual copies of your images to refine your style without modifying the original files.
- Use NextGEN Gallery to easily create and edit your WordPress galleries, add photos for proofing, and keep everything in sync straight from Lightroom.
By making Lightroom work for you through customization and plugin integration, you can quickly enhance your unique photography workflow. Remember, a smooth-running Lightroom means more time for creativity and less time for frustration!
Wow, we've covered a lot of ground in this guide to Lightroom workflows! You now have the tools and techniques to create stunning images in record time.
Remember, the key to a successful Lightroom workflow is to make it work for you. Customize your workspace, create your own presets, and leverage powerful plugins like NextGEN Gallery to supercharge your efficiency. With a little practice and experimentation, you'll develop a workflow that fits your needs.
Pro Tip: If you're new to editing, bookmark this Lightroom tutorial for beginners for easy reference. Trust me, it takes a while to remember all those keyboard shortcuts, but you're well on your way to becoming a Lightroom pro!
Don't have NextGEN Gallery yet? Get started today!
Be sure to check out our tutorial on How to Create a Stunning WordPress Image Gallery.
For more photography tips and WordPress tutorials, check out our blog.

